• Real Estate Photography, Videos, Tours, Printing & Design - Toronto, GTA & Surrounding Areas

Real Estate Info

4 Trees to Avoid Planting

800 536 Nisha Muire
Trees add so much beauty and life to a yard, it is understandable why they are so popular. However, before you decide on what tree to plant in your yard, here is a quick overview of some trees best avoided.
 
Silver Maple
These popular trees grow quickly and are beautiful making them a perennial choice with homeowners. However, because they grow so quickly, they are very brittle and prone to breaking during storms. Additionally, they have a very shallow root system that tends to invade sewer systems and cause plenty of damage.
 
The Aspen
The Aspen is a gorgeous white-barked tree that has lovely leaves. However, it also has a very strong root system that is virtually impossible to eradicate once established. Unless you want to be killing off young Aspens every year all over your property, it’s best to steer clear of this one.
 
Lombardy Poplar
The Lombardy Poplar is another homeowner favorite as it grows very fast and has a very distinct shape. However, they are prone to disease and bug infestation and can end up looking rather sparse and ugly. Then, when you want to get rid of it, its root system make is nearly impossible to do.
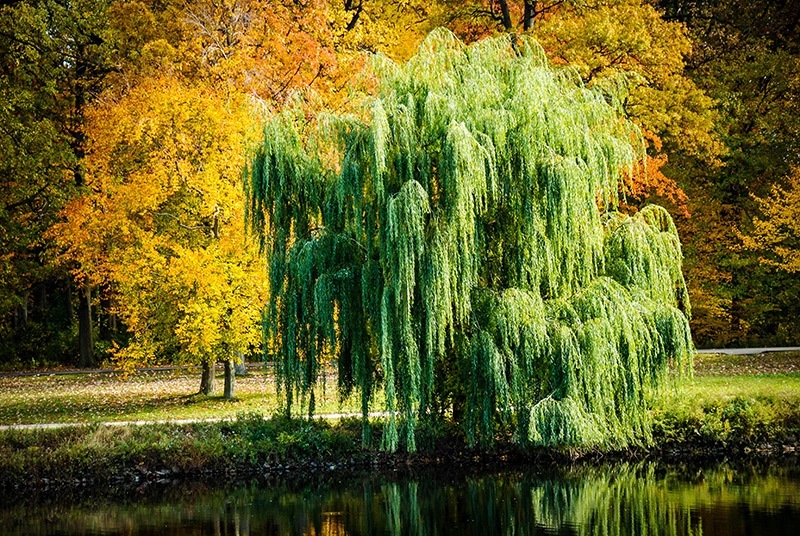
 
Willow
The weeping willow is one of the most beautiful and highly recognizable trees around. However, it is also the thirstiest! It’s strong root system will look for water everywhere and can destroy sewers, drains and foundations. Plus, it is has weak wood that will break easily and only lives for about 30 years.

Protect Your Fruit Trees from Pests

745 425 Nisha Muire
Growing fruit trees on your Toronto property is one of the many joys of owning your own home. Although it can take several season for a young fruit tree to start producing fruit, the wait is definitely worth the effort you’ll need to put into protecting your trees from pests. However, don’t despair, it doesn’t take much to protect your trees from the most common critters.
 
Easy fixes
Two of the most common pests are the apple maggot and cherry fruit fly. Luckily there is an easy fix for these bugs – the trick is to catch them in the spring before they hit your tree. The apple maggot and fruit fly overwinter in the ground and then emerge from the soil in the springtime. A great way to trap them is to simply paint an apple-sized ball red, coat it with vaseline and leave it at the base of your apple tree. All it takes is one ball, but it is enough to attract the bugs and get them stuck to it.
 
The Codling Moth is another big enemy of the apple tree. It can wreck havoc with your fruit and your tree. Scraping loose bark in the early spring and then spraying with an oil-controlling substance works well. But, for an easier fix try filling a plastic jug with a cup of vinegar, a banana peel and one sugar cube. Shake well and attach it to your tree. The moths love this mixture and drown when the go to check it ou.
 
Pruning and Cleanliness
Before the leaves sprout on your tree in the spring, take advantage of its leave-less state to see whether there are any diseased branches that need pruning or whether you can improve its shape.
 
Also be sure to remove any old fruit from on the tree or around the base of the tree to prevent it from causing disease or rot to spread to the tree and/or roots.
 
With these very simply measures you can have healthy and happy fruit trees in your yard every year and you can enjoy your own delicious harvest every fall.

Hedging on your hedges

1024 681 Nisha Muire
Hedges are the kind of exterior enhancement that immediately adds a natural beauty to your home. When well-maintained, they are elegant, beautiful and can add plenty of curbside appeal to your dwelling. However, neglect them and they can growing unkempt and take away from your home’s appeal. Once your hedges are planted and growing, maintaining them is relatively easy. If you follow these very simple steps, you can have lush, luxuriant hedges to frame your house.
 
– Spring is the best time to fertilize your hedges
– Adding hoof and horn meal to keep the soil loose and is a very good idea
– Water your hedges frequently all year-round, especially during dry period – and remember, evergreens don’t require as much water as flowering hedges
– When fall rolls around clear away dead wood and restore the mulch layer around your hedges if you have one
 
Another very important aspect to keeping your hedges healthy is periodic trimming. Once a hedge is established, it’s crucial to prune it depending what you want to encourage.
 
– If you trim the new wood in summer, it will help with branching
– If you trim the old wood in winter, it will help with the formation of strong new shoots
– When it comes to evergreen hedges be careful not to cut into old wood as it may inadvertently result in bald patches.
– If you have hedges that are manicured and shaped, then they should be trimmed at least three times during the spring and summer months
– To get bushy hedges, be sure to trim them on an angle
 
A great tip to make for a quick clean-up after your hedge-trimming is to spread a tarp, brown bags or newspaper underneath them so that you just have to scoop them up afterwards instead of raking for hours on end.

Caring for your fish pond

736 552 Nisha Muire
If your Toronto home includes a fish pond in the backyard, you probably already know how enjoyable these natural additions to your yard can be. However, if you are new to the game or contemplating such a feature, then there are a few things to keep in mind. Along with the proper placement and installation of such a feature, it’s also important to remember that they will require seasonal maintenance to remain in tip-top shape. Here is a basic overview of how to keep your fish pond in perfect shape.
 
Spring
Once the temperature starts to rise and you can see the life begin to return to your pond, it’s time to get it ready for another season. You can start by “unwinterizing” it – basically undo whatever you did in the winter to get it ready for the cold. This will include:
 
– Turning on the pump
– Feeding the fish once the temperature hits a constant 10 degrees
– Clean out any accumulation of leaves or debris or use a product to accelerate debris decomposition such as Microbe Life Sludge Away or EcoFix.
– Pump the water out of the pond until just covering the fish – conserve this water in a large receptacle that’s been placed in the shade
– Catch your fish and transfer for the receptacle
– Remove the plants if repotting is necessary and place in the shade and cover with a damp cloth; underwater plants should be placed in a container of water
– Once you’ve pumped as much water as possible from the pond, it’s time to finish removing sludge and debris – don’t use chemicals at this stage
– After everything is clean, you can return the water from the receptacle to the pond along with the fish
– Remember to add a dechlorinator to the water and then top up the pond with water from your hose
– Replace the plants while the water is refilling
 
Your pond is now ready for another season. Additionally tips:
– Fertilize plants every 3-4 weeks
– To reduce algae you can add Anacharis
 
Summer Care
Your plants will need constant care during your pond season. You’ll have to always remove dead leaves or debris. You will have to feed your fish properly. You should check and clean your filter regularly. Make sure that there’s proper aeration happening on especially warm days. And mostly, now is the time to really enjoy your pond!

Tips to installing an awesome water feature

522 600 Nisha Muire
Water features add an enchanting and natural feel to any yard. Whether you are in the heart of a big city or on a secluded lot in the countryside, installing a fountain on your grounds will add value and pleasure to your how you experience your dwelling. However, prior to adding any kind of water feature, it is important to keep a few very important guidelines in mind to protect your dwelling against potential leaks and the problems that they can cause.
 
Plan
On of the most crucial steps in the process is planning the placement of your water feature properly. Choose a spot that is stable enough to support the weight of a pond. If you have plants or trees nearby, make sure that they will not be able to pierce the liner. If you want to include fish in your pond, then remember to place it in an area with direct sunlight. Make sure that it is sloping away from your home.
 
Depth
The depth of your water feature will depend on whether you want it to include plants or fish. If you do want fish, then it needs to be deep enough for the fish to hibernate in the winter.
 
Kits and Liners
If you have never installed a water feature before, then using a kit is probably your best bet. Kits come with clear instructions and will help you to follow the proper procedure for installing your pond or fountain with confidence. When it comes to liners, butyl rubber is best and the thicker the liner the more chances of it lasting your lifetime. An added tip is to first layout carpet padding to cover any pebbles, which in turn will protect your liner from getting punctured.
 
Oxygenation
If you are installing a fish pond, consider adding a waterfall to increase the amount of oxygen in the water and to ensure that no stagnation occurs. Water circulation prevents algae from forming and prevents mosquitoes from laying eggs.
 
Edging
The right pond edging will give your water feature a natural, always-there look and help it blend seamlessly into the scenery.
 
Whatever kind of water feature you choose to install, you can rest assured of enjoying it for as long as you love your home.

Gorgeous Gazebos

1024 768 Nisha Muire
Installing a gazebo at your Toronto home can be as easy or as complicated as you wish to make it. Finding the perfect gazebo for your yard will involve several steps including deciding on it’s placement, how it will be anchored, the material it will be made out of and it’s permanence. Once you have settled on those elements, then you can think about how you want it to look. Gazebos can be romantic, modern, simple, ornate, functional or merely for show – regardless of what you choose for your yard, it will definitely be used!
 
The easiest gazebos to install are the temporary kind that you can find at most big box stores. They include structures that can be set up and taken down easily and quickly. The downside is that they are not very durable and not meant to withstand the elements. Most temporary gazebos are meant to last one season – after which the covering usually needs to be replaced. Even the more expensive temporary shelters will require a new covering after a couple of years.
 
More permanent gazebos are those that are built out of resin, wood or some form of composite. While there are kits available for sale at some retailers, most of these more permanent structures are custom designed and built to meet your specs. These more permanent structures can be quite elaborate and are meant for long-term use. Although considerably more expensive than their less permanent counterparts, they will endure for a much longer period of time.
 
The use that you plan for your gazebo will also influence the kind of structure you install. For instance, if you plan on using it as an eating area, then the shape will be more suited for tables and chairs. If you plan on making it an outdoor living room, then a square or rectangle is most commonly used, but it can also then be rounded or oval. If you merely want a screened-in spot for enjoying your garden quietly, then a round romantic gazebo might be more in keeping with your needs.
 
Gazebos can make terrific additions to any yard – they are functional, attractive and can add a layer of beauty and convenience to your grounds that you never even imagined.

Making the most of the sunshine with solar panels

774 500 Nisha Muire
Sunshine is great for more than just tanning and warming yourself at the beach – it is also a terrific way to get the lighting and heating you need for garden projects at your Toronto home. Whether you are looking for an alternative way to heat your pool or want some low-maintenance ways to light up your garden after dark, using solar power is an easy, affordable and eco-friendly way of getting the energy you need.
 
Garden Ideas
Solar lanterns, fairy lights and deck flares are great lighting options to get that soft glow and party-like ambiance in your yard for evening parties. Although there are the regular plug-in versions of these lights, the more useful option includes the solar variety. Just plant them in an area with full sun and let the solar cells soak up the light during the day and then they will turn on automatically when dark. Solar lighting for your garden is an easy, low-maintenance way to get the lighting you want without having to remember to turn on/off lights switches, plug/unplug cables, etc…
 
Solar Blanket
Solar blankets are one of the most popular ways of heating outdoor pools. Although it does require a steady supply of uninterrupted sunshine, newer solar blanket models are highly efficient and are far more effective than older versions.
 
Safety lighting
Another great use for solar power is for emergency and/or safety lighting. Ideally for lighting up walkways, lanes or infrequently used outdoor areas of your property, they are a good option for always having light when it is needed.
 
Solar power is evolving and getting better every year. The options for its use are varied and perfect for applications where you want a small energy footprint and high efficiency.

Alternative heating sources for your pool

260 194 Nisha Muire
Nothing beats a swimming pool in the summertime! If you are fortunate enough to have a swimming pool at your Toronto home, then you likely have had to consider the options when it came to heating sources. Although a warm summer can sufficiently heat a pool for maximum enjoyment, our weather rarely leaves room for more than a few weeks of summer heating. Instead, it is necessary to rely on alternate sources of heat to ensure a constant, pleasurable temperature for your pool.
 
There are a number of options when it comes to heating your pool. Although most people will install install an electric or gas-powered heater, those options will likely add hundreds of dollars to your energy costs and will also run you a few hundred dollars to install. There are several alternative heating options that some ingenious people have concocted to avoid those extra costs while still maintaining a comfortable water temperature even during the colder parts of the summer months.
 
Solar
Solar blankets for your pool are a great idea. Conventional solar blankets can be costly, but why-not build your own solar blanket for a fraction of what you would pay for a manufactured one? While there are a number of great ideas on Pinterest, one of the easiest and least expensive is using hula-hoops and polyurethane. All you need to do is buy a few hula-hoops, cover them in polyurethane and toss them into your pool and let the sun do the rest. Easy to build, easy to remove and easy to replace, they can raise your pool’s water temperature sufficiently to make it comfortable.
 
Another inexpensive solar option is to use black tubing, coiled in a snake formation that you place on your lawn or on you roof for maximum solar exposure. A pump pumps the water from your pool through this coil that is heated by the sun. While it won’t heat up your pool they way a conventional heater can, it will definitely take the chill away.
 
Wood
Another terrific and inexpensive option for heating the water in your pool is to harness the heat from your firepit or outdoor fireplace. Using a pump to pump the water from your pool into a coil of copper wire suspended in a barrel over or next to your fire pit can heat the water up beautifully – full instructions on how to build this very practical device can be found at any number of handy websites online.
 
Although we’ve only covered two options here for heating your pool, a quick search online will reveal a number of very useful links to great ideas for heating your pool while keeping your costs down.

The difference between a porch and portico

1024 768 Nisha Muire
Ever wondered whether your Toronto home has a porch or portico? You are not alone! While very similar, the two structures serve different purposes.
 
A porch is an extension of your home’s living space and usually runs the length of your facade. It is generally covered and used for sitting and relaxing or even entertaining. Porches have been around for centuries and still see plenty of use. The function of a porch has greatly evolved through the years and while they are still used regularly for enjoying a cool breeze at the end of the day, they have also become decorative and are used to enhance the overall look and curb appeal of a home.
 
The construction of porches varies greatly across structures. The flooring used also runs the gamut from place-to-place as does the covering as well.. They range from very casual structures to more formal ones. However, the one thing they all have in common is how functional and useful they are.
 
Porticos are strictly functional and are mainly meant to shelter your doorway and yourself from the elements while trying to enter or exit the house. They are also used to add plenty of drama to a structure. Usually reserved for grand homes and large buildings, porticos have also been successfully used on smaller residential properties.
 
Sometimes porticos are large enough to house a decorative table and set of chairs but they are rarely used for actual socializing due to their size and restrictiveness. However, they can still add plenty of drama and flare to an entranceway.
 
Regardless of whether you are thinking of adding a portico or a porch to your home, both options are great ways to enhance the overall look and curb appeal of your home.

Choosing the Right Walkway

1024 768 Nisha Muire
The walkway leading to your front door is an integral part of your Toronto home’s curbside appeal. Without a decent-looking walkway your home will look incomplete and unfinished. The kind of look you want for your property will dictate the kind of material that you choose for your walkway. In fact, walkways can run the gamut from poured concrete to wood to mosaics. Each medium has its own beauty and level of difficulty in application.
 
Concrete
Concrete is probably the longest-lasting material you can use for your walkway. Whether you hire someone to do it or do it yourself, concrete will require the proper prepping of the walkway site and the proper mixing of the concrete itself. Once poured, you can get creative and add patterns and/or whimsical elements to add dimension and visual interest to the walkway. When concrete is poured, you have to make sure that is cures slowly and remains slightly damp so that it is evenly dry throughout. Once it is fully dry, you will need to seal it ensure it lasts for as long as possible.
 
Flagstones
Flagstones are a very popular when it comes to walkways. However, flagstones can also be quite expensive if you are using natural stones. Artificial or composite stones are less expensive but don’t always have that unique look that natural stones impart. Flagstones can be laid out in a similar way to regular interlocking bricks or they can be laid down in a less formal way with grass in-between each stone. The latter option is easier to install and requires fewer stones, but more maintenance.
 
Mosaics
For the more ambitious, creating a mosaic out of stones, rocks, glass or other materials is a great option for really making the pathways around your home unique and memorable. Although requiring a lot more work, they can last a lifetime and are truly an expression of your unique personality.
 
Wood and Gravel
Wood and gravel are other very viable options for walkways. They add a different kind of sensibility to a home. While wood is warm, earthy and more organic, gravel is more a casual, contemporary and clean option.